Applying Transom Light Numbers & Letters
(Hinge Technique v4.2)
Things you will need
Masking tape
Chinagraph pencil (optional)
Rigid squeegee (you can use an old credit card)
Spirit level (useful, but not essential)
An assistant to help you
Anatomy of your markings
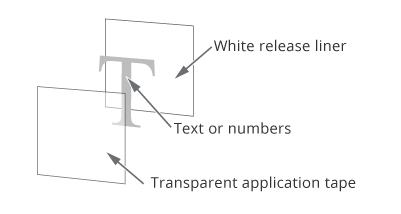
Your safety markings will be sandwiched between a transparent application tape on one side, and a white release liner on the other.
Do not separate these layers yet!
Some graphics may be divided into smaller sections, to aid installation at a later stage.
Step 1: Position your graphic
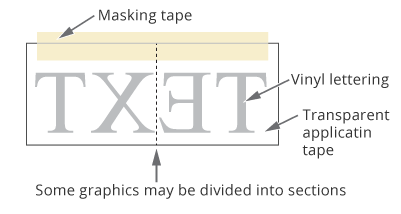
Position the graphic at the correct location, and temporarily hold the graphic in place with masking tape. It’s a good idea to have an assistant hold the graphic for you; he or she can also help position the graphic.
Next, use a piece of masking tape, to create a hinge along the top of the graphic. Once your graphic is in position; smooth firmly over the graphic using an old credit card. This will ensure that the vinyl lettering sticks to the application tape.
Step 2: Install your graphic
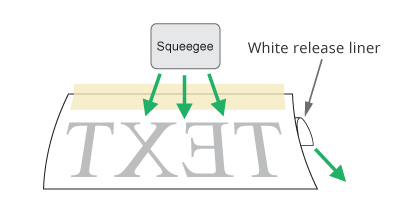
Lift up the graphic and peel back the white release liner. This will expose the sticky side of the graphic. Make sure you don’t allow the graphic to swing back down and touch the glass, or it may stick prematurely in the wrong position.
Now use the old credit card to press firmly down on the graphic, in a top to bottom motion (so as not to trap air bubbles).
Tip: Check from the outside, that the graphic has been thoroughly pressed onto the glass.
Step 3: Reveal the graphic
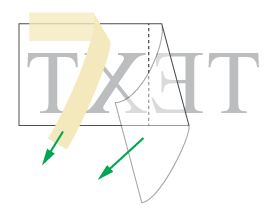
Now, peel away application tape to reveal the lettering.
Note: The application tape’s adhesive is not as sticky as the adhesive used on the vinyl text; therefore, it will leave the text in place as it is peeled away!


